Saturday, December 8, 2012

How to kill a SQL Connection/SPID through Activity Monitor?

How to kill a SQL Connection through Activity Monitor?
Activity Monitor is Graphical tool which tells you about the currently running processes, Resource Waits, Data file I/O and Expensive Queries.
This information is compiled from various System Tables and Views and if you have right permission you could re-arrange columns, click to sort, and right-click to kill a process and another advantage is- it will guide you to other tools that will help you solve those problems.
You need proper permissions(“View Server State”) to view Activity Monitor and to kill a connection you need SA permissions

The processor time shown here is a percentage of the time that SQL Server is exercising the processor — not the entire CPU itself. What that means is that while SQL Server might not be using a lot of processor, the Windows Operating system might have other tasks that are. Also, if you tied out only one processor to SQL Server on a dual-processor box, you need to take that into account as well.
 Waiting tasks are the SQL Server operations that are waiting on a resource to do their work. There is an entire school of thought about using wait information for Performance Tuning, and it has merit. Basically this school of thought says that if your system isn’t waiting on anything, it is working as fast as it can.
 The Database I/O graph shows how often the system is hitting the storage subsystem. It’s not an exact or comprehensive measurement, but it can quickly show you that this is where a lot of activity is going on. You want to avoid hitting the drive as much as you can, since this physical component is one of the slowest in the system.
 Batch Requests show general SQL Server query activity, although it’s only one of the measurements in this area.

How do I open Activity Monitor?
  
  1. Connect to SQLServer through SSMS
  2. Right click on Server and click on Activity Monitor
    
  1. Expand Process box
  2. Select the connection which you want to kill and right click and finally click on “Kill Process”

How to locate Surface Area Configuration in SQLServer2008/R2/2012?

How to locate Surface Area Configuration Tool  in SQLServer2008/R2/2012?

Surface Area Configuration is a security tool in SQLServer to disable/enable certain Server level (xpcmdshell, Remote DAC,SQLMail...)components. In SQLServer2005 you can directly open it under Configuration Tools but starting from SQL2008 and higher versions it is embedded in Facets.
What is Facet?
Facets is the property of SQL Server which the policy will consider managing. There are several facets on which policies could be implemented. For example, we will use the “Database Option” facet to implement a policy which will ensure that the AutoShrink option should be TRUE for all hosted databases on the server. Similarly, we will be creating policies on the Stored Procedure facet
Example: how to enable xpcmdshell through SAC in SQLserver2008?
  1. Connect to SQLServer through SSMS
  2. Right click on SQLServer
  3. Click on Facets
  4. On view Facets page select Surface Area Configuration from drop down list
  5. Got to XPCmdShellEnabled property and type “True” and click ok.
 

How to repair Suspect Databse in SQLServer?

How to repair Suspect Databse in SQLServer?
If you are supporting SQL Server you may see a database in Suspect mode in Production/Non Production, in suspect mode users canot connect to db and they canot perform any transaction.
In what circumstances a healthy databse goes in to suspect mode.
  1. Data/Log file corruption triggers
  2. if SQL cannot complete a rollback or rollforward operation
  3. Power failure at SQL Server
  4. If someone restarts sql services in middle of data loading process to tables through bulkinsert/SSIS
Now we will see how to bring back the database to normal state, first we need to put the database in “Emergency” mode and see any data pages/extents got corrupted by running dbcc checkdb command  if see any repair with data loss and bring back it to normal state.
Example: “ABC” is our Database which is actually gone in to suspect mode.
Connect to SQL Server through SSMS and open Query Analyzer and execute following commands.

EXEC sp_resetstatus 'ABC'
ALTER DATABASE ABC SET EMERGENCY
DBCC checkdb('ABC')
ALTER DATABASE ABC SET SINGLE_USER WITH ROLLBACK IMMEDIATE
DBCC CheckDB ('ABC', REPAIR_ALLOW_DATA_LOSS)
ALTER DATABASE ABC SET MULTI_USER

Friday, December 7, 2012

How to start SQLServer in single user mode?

How to start SQLServer in single user mode?

In some bad situations like whenever your master databse or other system databases got damaged you might need to start the SQL Server in single user mode in order to recover/restore.

Starting SQL Server in single-user mode enables any member of the computer's local Administrators group to connect to the instance of SQL Server as a member of the sysadmin fixed server role

How will I do that?

  1. Click on Start button à Run
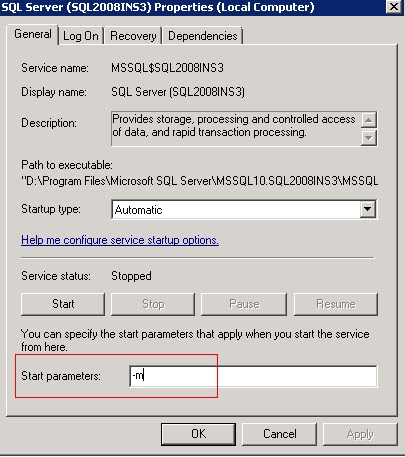
  2. Type services.msc and then enter (this opens service applet)
  3. Goto the SQLService and double click on it and stop it.
  4. Type  “-m” in Startup Parameters box

  1. Now start the service
Connect to the sql server through SSMS and restore/recover Master database or any system database, after recovering don’t forget to remove “-m” from Startup Parameter.

How to apply Service Pack/Hotfix on SQL2008/R2 Cluster?

How to apply Service Pack/Hotfix on SQL2008/R2 Cluster?

Applying ServicePack/Hotfix/Cummulatve on SQL2008/R2 cluster is even more simpler…… you should not directly install Service Packs on Production Environment first instead apply them on non Prod (DEV/SIT/UAT) and wait for few days and if you don’t find any errors then apply it on Prod.

Unlike with SQL2005 cluster, down time to apply patches is very minimal with SQL2008/R2 clusters because MS has introduced a new concept called Rolling Upgrade

So what is this Rolling Upgrade? During a rolling upgrade the changes are first applied to the passive node of a failover cluster.  Then the SQL Server instance is failed over to the updated node.  The upgrade is then applied to the remaining nodes.  The total outage time for the SQL Server instance is the amount of time that the SQL Server instance takes to fail over to the updated node and apply the metadata changes for the update

Basic funda in applying patches on SQL2008 or higher is, connect to a Passive node and make sure that it is not hosting any SQL Instance at that moment and apply patch on it and reboot it after reboot move the SQL Instances to Passive node, once moved Passive become Active and Active become Passive, now connect to Passive(Earlier it was Active) and apply the patch and reboot it  that’s it….


Anyone who has a very little knowledge on cluster can easily apply service packs if they follow below instructions.


Case-1
We have one SQL instance running from Node-A which is actually a two node cluster, that means we call this cluster as Active –Passive cluster, in our example Node-A is active node and Node-B is Passive node.


Step1:
First you need to take System Databases and User Databases backups and keep them at safer place.

Step2:
Download appropriate Service Pack/Hotfix/Cummulative Update on each cluster node(A/B).
A

Step3:
Connect to Passive node that means B node in our example and double click on service pack executable file, after successfully applying patch then reboot B node.

Step4:
After rebooting B node move the Instance to B node and verify the SQL Version by running Select @@version à this should show the latest patch version

Step5:
Connect to A node now and double click on service pack executable file, after successfully  applying  reboot A node.

Step5:
After rebooting A node, move SQL instance from B node to A node and then check the version by running Select @@version à this should show the latest patch version


Case-2
We have two SQL instances, SQLInstanace-1 is  running from Node-A and SQLInstanace-2 is running from B node, that means we call this cluster as Active –Active cluster, in our example Node-A is active node and Node-B is also Active node.


Step1:
First you need to take System Databases and User Databases backups and keep them at safer place.

Step2:
Download appropriate Service Pack/Hotfix/Cummulative Update on each cluster node(A/B).
A

Step3:
Move SQLInstance-2 from B node to A node and connect to B node(now it is not hosting any sql)
and double click on service pack executable file. After successfully applying patch reboot B node.

Step4:
After rebooting B node move the SQLInstanace-1 and SQLInstance-2 from A node to B node,  verify the SQL Version by running Select @@version à this should show the latest patch version

Step5:
Now Connect to A node (now it is not hosting any sql) and double click on service pack executable file. After successfully applying patch reboot A node.

Step6:
After rebooting A node, move SQLInstance-1 and move SQLInstance-2  from B node to A node and then check the version by running Select @@version à this should show the latest patch version and finally move the SQLInstance-2 from A to B node.

Wednesday, December 5, 2012

How to apply Service Pack/Hotfix on SQL2005 Cluster?

How to apply Service Pack/Hotfix on SQL2005 Cluster?

Applying ServicePack/Hotfix/Cummulatve on SQL2005 cluster is simple…… You should not directly install Service Packs on Production Environment first instead apply them on non Prod (DEV/SIT/UAT) and wait for few days and if you don’t see any issues/errors then apply it on Prod.

Anyone who has a very little knowledge on cluster can easily apply service packs if they follow below instructions.


Case-1
We have one SQL instance running from Node-A which is actually a two node cluster, that means we call this cluster as Active –Passive cluster, in our example Node-A is active node and Node-B is Passive node.


Step1:
First you need to take System Databases and User Databases backups and keep them at safer place.

Step2:
Download appropriate Service Pack/Hotfix/Cummulative Update on each cluster node(A/B).
A

Step3:
Connect to Active node that means A node in our example and double click on service pack executable file, in this process installer first applies patch on Passive node (B node) after that it will apply patch on A node. After successfully applying patch, move SQL Instance from A node to B node and then reboot A node.

Step4:
After rebooting A node move the Instance back to A node and verify the SQL Version by running Select @@version à this should show the latest patch version

Step5:
Connect to B node and double click on service pack executable file, this patch is cluster aware then it will not pickup SQL Instance/Tools in that case you can simply close that otherwise if it pickup like SQLTools/Integration Service then apply it and finally reboot B node.

Step5:
After rebooting B node, move SQL instance from A node to B node and then check the version by running Select @@version à this should show the latest patch version


Case-2
We have two SQL instances, SQLInstanace-1 is  running from Node-A and SQLInstanace-2 is running from B node, that means we call this cluster as Active –Active cluster, in our example Node-A is active node and Node-B is also Active node.


Step1:
First you need to take System Databases and User Databases backups and keep them at safer place.

Step2:
Download appropriate Service Pack/Hotfix/Cummulative Update on each cluster node(A/B).
A

Step3:
Connect to A node in our example and double click on service pack executable file, in this process installer first applies patch on Passive node (B node because for SQLInstance-1  B node is passive) after that it will apply patch on A node. After successfully applying patch, move SQL Instance-1 from A node to B node and then reboot A node.

Step4:
After rebooting A node move the SQLInstanace-1 back to A node and verify the SQL Version by running Select @@version à this should show the latest patch version

Step5:
Connect to B node and double click on service pack executable file, in this process installer first applies patch on Passive node (A node because for SQLInstance-2  A node is passive) related to SQLInstance-2 after that it will apply patch on B node. After successfully applying patch, move SQL Instance-2 from B node to A node and then reboot B node.

Step5:
After rebooting B node, move SQLInstance-2 from A node to B node and then check the version by running Select @@version à this should show the latest patch version

Monday, December 3, 2012

Basic SQL Commands for beginers

Basic SQL Commands for beginers:

Following are useful basic sql syntaxes for freshers.
SQL server is case insensitive, that means -  “Create” and “CREATE” have same meaning.

SQL SELECT Statement:
SELECT column1, column2....columnN
FROM   table_name;

SQL DISTINCT Clause:
SELECT DISTINCT column1, column2....columnN
FROM   table_name;

SQL WHERE Clause:
SELECT column1, column2....columnN
FROM   table_name
WHERE  CONDITION;

SQL AND/OR Clause:
SELECT column1, column2....columnN
FROM   table_name
WHERE  CONDITION-1 {AND|OR} CONDITION-2;

SQL IN Clause:
SELECT column1, column2....columnN
FROM   table_name
WHERE  column_name IN (val-1, val-2,...val-N);

SQL BETWEEN Clause:
SELECT column1, column2....columnN
FROM   table_name
WHERE  column_name BETWEEN val-1 AND val-2;

SQL Like Clause:
SELECT column1, column2....columnN
FROM   table_name
WHERE  column_name LIKE { PATTERN };

SQL ORDER BY Clause:
SELECT column1, column2....columnN
FROM   table_name
WHERE  CONDITION
ORDER BY column_name {ASC|DESC};

SQL GROUP BY Clause:
SELECT SUM(column_name)
FROM   table_name
WHERE  CONDITION
GROUP BY column_name;

SQL COUNT Clause:
SELECT COUNT(column_name)
FROM   table_name
WHERE  CONDITION;

SQL HAVING Clause:
SELECT SUM(column_name)
FROM   table_name
WHERE  CONDITION
GROUP BY column_name
HAVING (arithematic function condition);

SQL CREATE TABLE Statement:
CREATE TABLE table_name(
column1 datatype,
column2 datatype,
column3 datatype,
.....
columnN datatype,
PRIMARY KEY( one or more columns )
);

SQL DROP TABLE Statement:
DROP TABLE table_name;

SQL CREATE INDEX Statement :
CREATE UNIQUE INDEX index_name
ON table_name ( column1, column2,...columnN);


SQL DROP INDEX Statement :
ALTER TABLE table_name
DROP INDEX index_name;

SQL DESC Statement :
DESC table_name;

SQL TRUNCATE TABLE Statement:
TRUNCATE TABLE table_name;

SQL ALTER TABLE Statement:
ALTER TABLE table_name {ADD|DROP|MODIFY} column_name {data_ype};

SQL ALTER TABLE Statement (Rename) :
ALTER TABLE table_name RENAME TO new_table_name;

SQL INSERT INTO Statement:
INSERT INTO table_name( column1, column2....columnN)
VALUES ( value1, value2....valueN);

SQL UPDATE Statement:
UPDATE table_name
SET column1 = value1, column2 = value2....columnN=valueN
[ WHERE  CONDITION ];

SQL DELETE Statement:
DELETE FROM table_name
WHERE  {CONDITION};

SQL CREATE DATABASE Statement:
CREATE DATABASE database_name;

SQL DROP DATABASE Statement:
DROP DATABASE database_name;

SQL USE Statement:
USE DATABASE database_name;

SQL COMMIT Statement:
COMMIT;

SQL ROLLBACK Statement:
ROLLBACK;